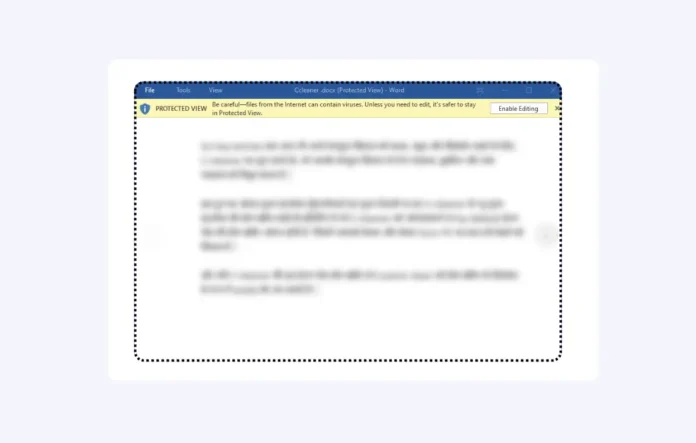
Hey everyone! If you’re like me and use Microsoft Word for work or personal projects, you’ve probably run into the annoying “Protected View” feature. You know the drill: you download a document, open it, and then you’re greeted with that yellow banner telling you it’s in Protected View. You have to click “Enable Editing” every single time, and honestly, it can be a real pain, especially when you’re trying to get things done.
But don’t worry! I’ve got a quick and easy solution for you. In this post, I’ll explain what is this and how to fix it, why it exists, and how you can disable it in just a few simple steps. Let’s jump right in! (See: How to Combine Word Documents into One)
What is Protected View?
First off, let’s talk about what this problem is. It’s a security feature in Microsoft Word that’s designed to keep your computer safe from potentially harmful files. When you download a document from the internet or get one as an email attachment, Word opens it in Protected View by default. This means you can only read the document and can’t make any changes until you click “Enable Editing.”
Now, while this feature is great for protecting you from malware and other nasty stuff, it can be a bit of a hassle if you’re working with documents from sources you trust. If you know the files are safe, having to click that button every time can feel unnecessary.
Why Does Protected View Matter?
The main reason for Protected View is to protect your system from malicious content. Let’s face it: cyber threats are everywhere, and many of us unknowingly download harmful files. By opening documents in a read-only mode, Microsoft Word gives you a layer of protection against these threats.
However, if you’re consistently working with documents from reliable sources—like your own downloads or files shared by colleagues—this feature can feel more like a roadblock than a safeguard. That’s why many users, including myself, look for ways to disable it.
How to Disable This Message in Microsoft Word
Now that we’ve covered what Protected View is and why it exists, let’s get to the good part: how to disable it! The process is super simple and can be done in just a few seconds. Here’s how:
- Open a Document: Start by opening any Word document that’s currently in Protected View. You’ll see a yellow banner at the top letting you know it’s in this mode.

- Find the Hyperlink: Look for the hyperlink next to the Protected View message. It usually says something like “Enable Editing.” Click on that link.

- Access Protected View Settings: After clicking the hyperlink, a new window will pop up. In this window, you’ll see an option for “Protected View Settings.” Click on that.

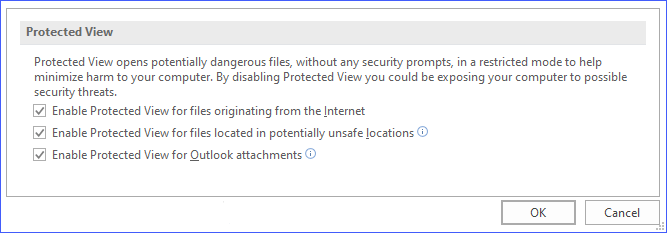
- Uncheck the Boxes: In the Protected View Settings window, you’ll see three checkboxes. These typically include options like:
- “Enable Protected View for files originating from the internet”
- “Enable Protected View for files located in unsafe locations”
- “Enable Protected View for Outlook attachments”

Just uncheck all three boxes to disable the problem for these types of files.
- Click OK: After unchecking the boxes, hit the “OK” button to save your changes.
And that’s it! You’ve successfully disabled it, and you won’t have to click “Enable Editing” every time you open a document from a trusted source.
Things to Consider Before Disabling This Errror
While disabling this warning message can make your life easier, it’s important to think about the potential risks. By turning off this feature, you’re allowing all documents to open without that protective barrier. Here are a few things to keep in mind:
- Be Cautious with Unknown Sources: If you often download files from unfamiliar websites or receive documents from unknown senders, it’s wise to keep Protected View enabled. This will help protect your system from potential threats.
- Use Antivirus Software: Make sure you have reliable antivirus software installed on your computer. This adds an extra layer of security, even if you choose to disable Protected View.
- Stay Informed: Keep yourself updated on the latest cybersecurity threats and best practices. Being aware of the potential risks can help you make informed decisions about when to disable this feature.
Final Thoughts
In summary, this message helps keep your computer safe, but it can be annoying for people who often work with documents they trust. If you follow the easy steps I’ve shared, you can turn off this feature and have a better time editing in Microsoft Word.
Just remember to weigh the pros and cons before making changes to your settings, and always prioritize your cybersecurity. Happy editing, and may your Word documents be free of interruptions!


